Synergy Home Android 4.2 Device Setup
1. Setup Device
A. Power ON the device supplied with power supply.
B. Device will bootup with Chinese logo.
C. Replace it with Synel Logo
a. Go to H:\Synergy Workforce\Synergy Home\Additional Installation Files and copy folder “a20_repair” onto root of USB stick
i. Make sure there is nothing else in the USB stick
ii. Insert USB Stick into Synergy Home device
b. Power OFF and Power ON the device
c. Wait for device to come on. Device will automatically find the files from USB stick and reboot by itself
d. When it reboots, you will find the Synel logo appearing on device
i. Remove the USB stick immediately after device has rebooted
D. Install English Google Keyboard
a. By default, device comes with Chinese keyboard
b. Go to H:\Synergy Workforce\Synergy Home\Additional Installation Files and copy the file
“com.google.android.inputmethod.latin_7.1.22.217266466-release-armeabi-v7a-26712213_minAPI17(armeabi-v7a)(nodpi)_apkmirror.com.apk” onto USB stick
c. Plug in the USB stick to device
d. From main menu, go to File Browser then File Manager and then select USB stick
e. Click on the file “com.google.android.inputmethod.latin_7.1.22.217266466-release-armeabi-v7a-26712213_minAPI17(armeabi-v7a)(nodpi)_apkmirror.com.apk” to install the Google keyboard
E. Once installed, you will need to configure the keyboard
a. Open the installed application
b. Click on Enable in Settings and change it from Chinese keyboard to Google Keyboard (click ok on the warning to proceed)
c. Switch input method and any additional settings related to keyboard to English UK and click finished
d. While in Settings also set the Date & Time format to Correct Country defaults and Enable Automatic Time Updates
F. Wi-Fi Network
a. From home screen, go to Application and then settings
b. Select Wi-Fi network you want to connect and insert passphrase and click Connect
c. Make sure the device is connected
G. Finally go to Display and increase the brightness.
2. Installing ISL
a. Copy ISL_Light-4.4.1825.40.apk on root of USB Stick.
i. File H:\Synergy Workforce\Synergy Home\Additional Installation Files
b. Go to File Browser on the device
c. USB
d. Install the application and Launch it
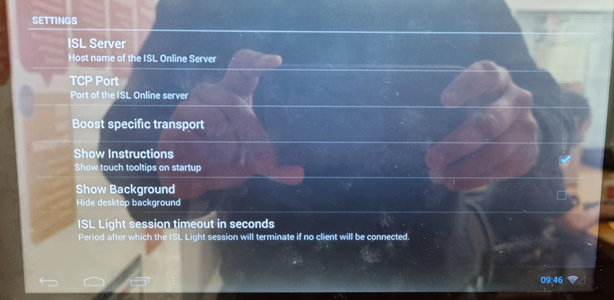
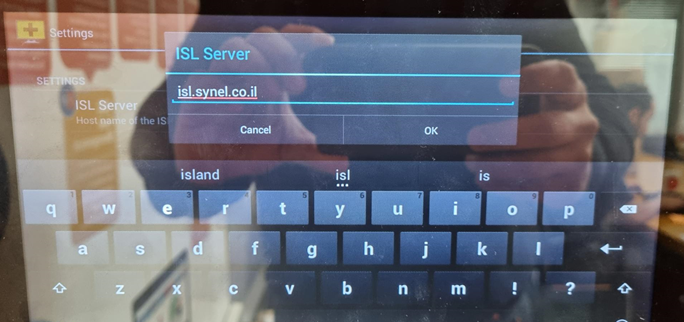
e. Next go to settings (click on 3 dots vertically on top right
hand corner) and insert the ISL server URL as isl.synel.co.il 

f. Once setup, it can be used for remote access to the device
3. Install Synergy Home Application
a. Go to H:\Synergy Workforce\Synergy Home and copy the latest version of the Application file to the USB stick
i. For example, the file name will look like v4.1.0.31082021.JellyBeans.apk. It includes the release date at the end
b. Go to File Browser, USB stick and click on the Application to install
c. Click Next to proceed
d. Click on Install
e. Once installed, click on Open to launch the application
4. Configure Synergy Home with Synergy Workforce
A. When application is launched first time, device will ask to configure the URL and device ID

Respective Customer Synergy Workforce site must be setup prior to setting up the device
B. Insert the Base URL and Device SQL ID and click Save

Base URL = Customer Site
Device ID = SQL Id of the device that must exist first on Synergy Workforce
C. Device will continue to launch the application.
D. Application will look like below screenshot when launched successfully.
Hide bottom line.
To hide:
a. Go to Home - Applications and then select Shell
b. Type following commands exactly and press enter key
su
mount -o remount /system
busybox sed -i 's/alwayshide=false/alwayshide=true/' /system/build.prop reboot
To Show:
a. Go to Home - Applications and then select Shell
b. Type following commands exactly and press enter key
su
mount -o remount /system
busybox sed -i 's/alwayshide=true/alwayshide=false/' /system/build.prop reboot
Force the LAN to reconnect each time
a. Go to Home - Applications and then select Shell
b. Type following commands exactly and press enter key
su
busybox sed -i ‘1i sleep 10’ /mnt/app/mac.sh
reboot
5. Error Messages
a. Code:102 means Finger template no found or doesn’t match
Related Articles
VM Kiosk Setup - Samsung Tablet
1. Select default language – English (United Kingdom) 2. Agree to just End User License Agreement and click Next 3. Skip the step to bring old data 4. Select Wi-Fi network for the device and enter password, make ...Synergy Home Android 4.2 - User Guide
1. Idle Screen Depending on the options enabled/disabled for the device, Idle screen will display following: 1. Left Panel - Displays the Admin icon, Current date and time, Globe symbol if device is ONLINE and Application version no. ...Adam 6050 Device Setup
Introduction ADAM 6050 Ethernet based data acquisition and control modules provide I/O, data acquisitions, and networking in one module. Through standard Ethernet networking, ADAM 6050 retrieves I/O values from sensors (Fire Panel), and publishes ...Synergy 10 Data Capture Terminal - Error Messages Solutions
If you are using the Synergy 10 device and you come across an error message, there may be solutions to it that you can apply before contacting support. Please look at the guide below. Problem Caused by Solution The terminal reboots itself without any ...Synergy 5 Data Capture Terminal - Error Messages Solutions
If you are using the Synergy 5 device and you come across an error message, there may be solutions to it that you can apply before contacting support. Please look at the guide below. Problem Caused by Solution The terminal reboots itself without any ...